

Silver Mountain Bike Park - is there a better descent in the world?
WOW - Lithium Trail - Teton Pass, Jackson Wyoming
The not so enjoyable part of Mountain Biking in Whistler
Bottom of the World - Surviving Whistler Top to Bottom
Conquering Whistler's Top of the World Trail
Fantasy Enduro - Enduro World Series Fantasy Game
Is the Thredbo AM Trail the best descent in Australia?
MTB Trail Videos - Trail Centre Upgrade Program
VIDEO: The Fourth 365 Days of Reign - My 4th year of Mountain Biking
Pilot Wilderness Ride - Cascade to Pinch - Part 2
Pilot Wilderness Ride - Cascade to Pinch - Part 1
MTB Workout for the Deskbound
Finding Bruce Ridge and Loving It!
VIDEO: Top XC Rides of 2014/2015
VIDEO: 2015 The FAIL Awakens
VIDEO: Nine Days in the Rotorua Redwoods
Exploring all of Sparrow Hill and the East Kowen Forest
VIDEO: 365 Days of Reign - The Third (year of serious mountain biking)
The New Majura Pines and Sparrow Hill Trip
Mountain Biking in the NSW Snowy Mountains
Long term test: Yakima Highroller and Whispbar roof rack
Travelling tips for Mountain Bikers
VIDEO: Giant Anthem 29er vs Giant Reign 26
VIDEO: 2014 FAILS - Will Ride, Will Fail
VIDEO: MTB-TVs TOP 10 Descents of 2014
VIDEO: The Opening of the Alpine Epic Trail - Mt Buller
VIDEO: Wrapping up the Redwoods with a Whak-en Outrageous Ride
VIDEO: Return to the Redwoods Part IV - Eagle vs Shark
VIDEO: Return to the Redwoods Part III - XC Lower Mountain Pedally Days
VIDEO: Return to the Redwoods Part II - Heavily Rooted
VIDEO: Return to the Redwoods Part I - We're Going To The Redwoods
Video: Return to Rotorua ... ok to go!
Video: Return to Rotorua ... definitely maybe!
Video: Return to Rotorua .. maybe?
Cycology - Cycling inspired clothing
Broken Bone on Breakout
Mountain Bike Fail to Triumph in the You Yangs
365 Days of Reign - My 2nd Year on a real mountain bike
Review: the Bionicon C-Guide V2.0
Brake disk rotor size upgrade 180 to 200mm, 160 to 180mm
VIDEO: Rotorua Redwoods - Create Breathing Space
Rotorua - a Mountain Bikers Journey
Summer Mountain Bike Training at OMV
2013 Another Year of #FAIL
We're going to ride the Rotorua Redwoods
My god I love riding Stromlo Forest Park
Merry Christmas from MTB-TV - What a year its been
How to view web based KML files on your mobile device
Epic Brake Bleeding Solutions - Avid Brake Bleed Kit
The Lone Wolf enjoys some group action
Bantry Bay (Northern Beaches, Sydney)
Bruce Ridge (Canberra)
Bungarra Alpine Centre (Snowy Mountains)
Currumbin Border Track (NSW/QLD Border)
Daisy Hill (South Brisbane)
East Kowen (Kowen Pine Forest, Canberra)
Forest Pipeline (Northern Beaches, Sydney)
Fred Caterson Reserve (Castle Hill)
Golden Jubilee Field MTB Park (North Shore, Sydney)
Hassans Walls (Lithgow)
Hinze Dam (Gold Coast)
Jackson (Jackson)
Jindabyne (Snowy Mountains)
Kiwarrak State Forest (Tarree)
Majura Pines (Majura, Canberra)
Manly Dam (Northern Beaches, Sydney)
Mt Joyce (Gold Coast Hinterland)
Mt Kosciuszko (Snowy Mountains)
Nerang State Forest (Gold Coast)
Newnes (Lithgow)
Old Man's Valley (Hornsby, Sydney)
Ourimbah (Central Coast)
Oxford Falls (Northern Beaches, Sydney)
Pilot Wilderness (Snowy Mountains)
Red Hill (Northern Beaches, Sydney)
Rotorua Redwoods (New Zealand)
Silver Mountain (Kellogg)
Singleton (Hunter Valley)
Sparrow Hill (Kowen Pine Forest, Canberra)
St Ives and Belrose (North Shore, Sydney)
Stromlo Forest Park (Canberra)
Terrey Hills (Northern Beaches, Sydney)
The Oaks (Blue Mountains)
Thredbo Resort (Snowy Mountains)
Thredbo Valley Trail (Snowy Mountains)
Whistler Bike Park (Whistler)
Wingello (Southern Highlands)
Wylde MTB Trail (Cecil Park - Western Sydney)
Brake disk rotor size upgrade 180 to 200mm, 160 to 180mm
In this blog I want to explain the quite simple process of upgrading an Avid Elixir 180mm front / 160mm rear to a 200mm front / 180mm rear. I've done a couple of trial runs down my VERY steep street the additional stopping power is quite amazing.
Being a 110kg bloke who loves descending I've long considered upgrading my brakes from the stock Avid Elixir 5's. It would seem logical to go for a serious downhill kit but unfortunately the budget didn't reach that far so instead I decided to increase my rotor size.
At first the rotor size upgrade seemed quite a daunting exercise but some tips from an online source and the brain power of my 16 year old son made the whole process quite simple.
First and most importantly I only needed to buy 1 x adaptor/screw set and the 200mm rotor, which meant the upgrade was less than $100.
The most confusing part was trying to work out which adaptor to buy. Rather than guess I sought the help of my not-so-local online bike shop. Importantly I sent a link to the spec page of my bike - always a good idea because then the tech knows exactly what they are dealing with.
For my setup I needed a Avid 40 Post mount and screws. The screws were needed as were all the other mounting parts current setup - so make sure you order a kit with screws or you will probably end up having to head out to your LBS.
The new rotor came with mounting screws meaning the only bits left over were the 140mm rotor and the old rotor mounting screws.
The numbers in the notes below refer to the image. Left is before, right is after. Click on the image to see a full size version.
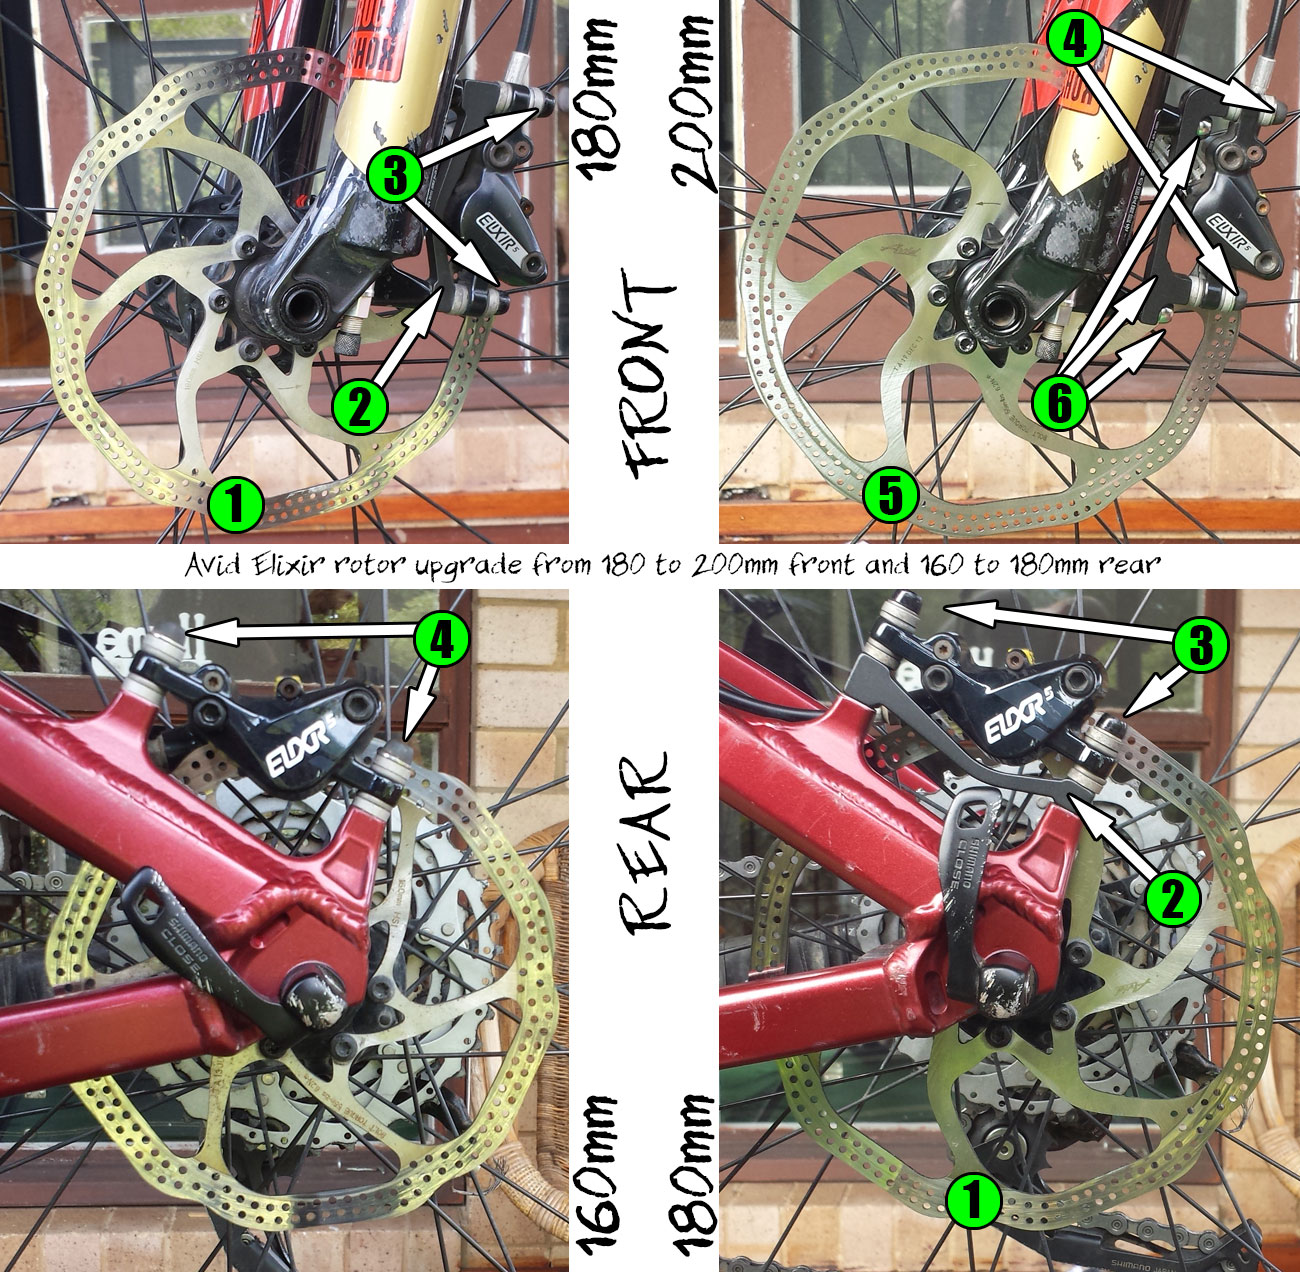
- The 180mm front rotor becomes the new 180mm rear rotor
- The front post mounting bracket becomes the new rear mounting bracket note the smaller end is at the rear and the bigger end at the front (I hope I got this right)
- The front post mount screws become the new rear mount screws
- The rear post mount screws become the new front screws that connect the brake calliper with the new mounting bracket
- The new 200mm front rotor
- The new 40P front mounting bracket and the 2 small screws that came with the mounting bracket
Step 6 was probably the most confusing. If you look carefully you can see that the mounting bracket is screwed into the fork (step 6) and a different set of screws attach the brake calliper to the mounting bracket (step 4).
I spent more time realigning my callipers than the rest of the job.