

Silver Mountain Bike Park - is there a better descent in the world?
WOW - Lithium Trail - Teton Pass, Jackson Wyoming
The not so enjoyable part of Mountain Biking in Whistler
Bottom of the World - Surviving Whistler Top to Bottom
Conquering Whistler's Top of the World Trail
Fantasy Enduro - Enduro World Series Fantasy Game
Is the Thredbo AM Trail the best descent in Australia?
MTB Trail Videos - Trail Centre Upgrade Program
VIDEO: The Fourth 365 Days of Reign - My 4th year of Mountain Biking
Pilot Wilderness Ride - Cascade to Pinch - Part 2
Pilot Wilderness Ride - Cascade to Pinch - Part 1
MTB Workout for the Deskbound
Finding Bruce Ridge and Loving It!
VIDEO: Top XC Rides of 2014/2015
VIDEO: 2015 The FAIL Awakens
VIDEO: Nine Days in the Rotorua Redwoods
Exploring all of Sparrow Hill and the East Kowen Forest
VIDEO: 365 Days of Reign - The Third (year of serious mountain biking)
The New Majura Pines and Sparrow Hill Trip
Mountain Biking in the NSW Snowy Mountains
Long term test: Yakima Highroller and Whispbar roof rack
Travelling tips for Mountain Bikers
VIDEO: Giant Anthem 29er vs Giant Reign 26
VIDEO: 2014 FAILS - Will Ride, Will Fail
VIDEO: MTB-TVs TOP 10 Descents of 2014
VIDEO: The Opening of the Alpine Epic Trail - Mt Buller
VIDEO: Wrapping up the Redwoods with a Whak-en Outrageous Ride
VIDEO: Return to the Redwoods Part IV - Eagle vs Shark
VIDEO: Return to the Redwoods Part III - XC Lower Mountain Pedally Days
VIDEO: Return to the Redwoods Part II - Heavily Rooted
VIDEO: Return to the Redwoods Part I - We're Going To The Redwoods
Video: Return to Rotorua ... ok to go!
Video: Return to Rotorua ... definitely maybe!
Video: Return to Rotorua .. maybe?
Cycology - Cycling inspired clothing
Broken Bone on Breakout
Mountain Bike Fail to Triumph in the You Yangs
365 Days of Reign - My 2nd Year on a real mountain bike
Review: the Bionicon C-Guide V2.0
Brake disk rotor size upgrade 180 to 200mm, 160 to 180mm
VIDEO: Rotorua Redwoods - Create Breathing Space
Rotorua - a Mountain Bikers Journey
Summer Mountain Bike Training at OMV
2013 Another Year of #FAIL
We're going to ride the Rotorua Redwoods
My god I love riding Stromlo Forest Park
Merry Christmas from MTB-TV - What a year its been
How to view web based KML files on your mobile device
Epic Brake Bleeding Solutions - Avid Brake Bleed Kit
The Lone Wolf enjoys some group action
Bantry Bay (Northern Beaches, Sydney)
Bruce Ridge (Canberra)
Bungarra Alpine Centre (Snowy Mountains)
Currumbin Border Track (NSW/QLD Border)
Daisy Hill (South Brisbane)
East Kowen (Kowen Pine Forest, Canberra)
Forest Pipeline (Northern Beaches, Sydney)
Fred Caterson Reserve (Castle Hill)
Golden Jubilee Field MTB Park (North Shore, Sydney)
Hassans Walls (Lithgow)
Hinze Dam (Gold Coast)
Jackson (Jackson)
Jindabyne (Snowy Mountains)
Kiwarrak State Forest (Tarree)
Majura Pines (Majura, Canberra)
Manly Dam (Northern Beaches, Sydney)
Mt Joyce (Gold Coast Hinterland)
Mt Kosciuszko (Snowy Mountains)
Nerang State Forest (Gold Coast)
Newnes (Lithgow)
Old Man's Valley (Hornsby, Sydney)
Ourimbah (Central Coast)
Oxford Falls (Northern Beaches, Sydney)
Pilot Wilderness (Snowy Mountains)
Red Hill (Northern Beaches, Sydney)
Rotorua Redwoods (New Zealand)
Silver Mountain (Kellogg)
Singleton (Hunter Valley)
Sparrow Hill (Kowen Pine Forest, Canberra)
St Ives and Belrose (North Shore, Sydney)
Stromlo Forest Park (Canberra)
Terrey Hills (Northern Beaches, Sydney)
The Oaks (Blue Mountains)
Thredbo Resort (Snowy Mountains)
Thredbo Valley Trail (Snowy Mountains)
Whistler Bike Park (Whistler)
Wingello (Southern Highlands)
Wylde MTB Trail (Cecil Park - Western Sydney)
Travelling tips for Mountain Bikers
Over the past 18 months I've had the opportunity to do a reasonable amount of travelling with my mountain bike. On many occasions the MTB component has been added to a trip taken for other reasons and in almost all occasions I've been on my own so this has taught me to be self-reliant and well prepared as well as how to streamline and simplify travelling with my bike.
This isn't in any way a comprehensive travel tips list however what I've included here are some must haves and cool things I've worked out along the way.
While there are some great general travelling tips in this post most of what I've written about is relevant to flying with your bike.
I've also included links to other great bike travelling information at the bottom. If you have any tips of your own please add them below using Facebook and please don't hesitate to contact me for any info.
Preparation
 Lists, lists and more lists - Make a list of everything you need to take. You might be surprised how much stuff you need if you have to rebuild, inflate, set-up, breakdown, clean and repack your bike, but there are other important reasons for lists that I will mention later.
If you aren't a list maker then the way to approach this is to think through your trip from the time you start packing until you return home - step by step. Travelling, riding, sleeping, eating, washing, commuting, packing, unpacking and getting home. I'm a geek so EVERYTHING goes into Evernote (a notepad that syncs across all your devices). I have default travelling lists based on if I'm flying or not, what bike I'm taking and what sort of trails I'm riding (eg if I need a full face and body armour), I simply tweak one of the default lists appropriate for the trip I'm taking.
The more significant the trip the more time I spend on my lists. It makes the whole travelling experience far less stressful and ultimately gives me more time on my bike.
- The local bike shops - Find out where all the local bike shops are near your destination. You never know what you might have forgotten or worse have damaged in transit. They are also great for local knowledge not to mention somewhere to go when you're having a post ride stretch of the legs.
- Know the trails - Contact the local MTB Clubs and stores, print off maps, download apps or GPX maps of where you are going to ride. Watch videos of the trails so you know what to expect. PS That's precisely what this website is for!
- Practice packing and building - Do a practice breakdown and rebuild to make sure you have all the tools and gear needed. Everything you use should be placed in a separate pile to guarantee you don't forget anything, I update my lists at this point. Note that a practice rebuild is important, you will need different tools for building, like a pump, pressure gauge, shock pump, grease etc.
One of the worst mistakes you can make is not doing a practice pack and re-build, in fact on my last trip to Rotorua I made a last minute weight-related-decision not to bring my pedal wrench and opt to use the allen key on my multitool, however having not tried using the multitool before I didn't realise I couldn't get anywhere near enough leverage to undo the pedals. Thankfully the motel was bike friendly and had bike tools #WINNING.
A practice breakdown and build will make sure you have everything you need. - Know how long it takes - time your practice clean, breakdown and pack, it may take you a lot longer than you realise. Despite getting fairly smooth at this process it still takes me 1 hour from a clean bike to a fully sealed bike box with all my gear inside. Add 1+ hours to fully clean and dry the bike. 2-3 hours to be ready to fly .. important numbers if you're trying to make a return flight.
- Is it all worth it? - Considering that it might take you 2 hours to assemble the bike and get on the trail and 3 hours to pack up should you just hire a bike? That's what I did on my first weekend trip to Rotorua.
Gear
 Plastic Bags - I tend to pack my clothes in plastic shopping bags and place them in the bike box. I always carry half a dozen spare bags too which surprisingly adds around 100g to your luggage. Separating your gear in bags has some obvious and some less obvious advantages.
 - Separating clean from dirty clothes
- Keeping the rental car clean
- Small bags of gear can be strategically placed in the bike box for padding
- Having kits packed separately (eg riding bag, casual clothes bag, sleeping gear, swimming bag, tools bag, rehab gear bag) means it's easy to find stuff without having to totally unpack. Really helpful if you are only staying 1 night at each place
- Having your gear in bags makes it a hell of a lot quicker to get on the trail and get packed up without screwing around
- Ziplock lunch bags - Great for on-trail food, putting your greasy chain and pedals in, putting your phone or other electronics in if it rains and for creating ice-packs.
- Tape -
- Electrical tape is a must and is somewhat reusable especially on bubble wrap. Electrical tape is cheap if you go to the right places, you can usually buy a multi pack from Bunnings for about $4 - don't pay $4 per roll.
- Packing tape If you're using a cardboard bike box don't forget that you need to be able to reseal the box on the way home. Are you putting packing tape inside before sealing the box or buying some when you get there?
- Hardware Stores and Two Dollar Shops are good for cheap tape
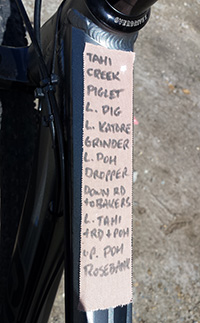
- Elastoplast is really handy for placing trail notes on your top tube for a long day on the trails. It saves you having to get out the map or app at each intersection .. not to mention great for covering up grazes or strapping sore joints. I never go on holidays without it.
- Rags - I try to fit a few rags in my kit for cleaning, also handy when setting up or breaking down. I take an old shirt to wear while working on or cleaning the bike. I usually throw the rags and t-shirt away before heading home.
- Drop sheet - I've picked up a bunch of light weight plastic painting drop sheets from Bunnings for about $2 each. Brilliant for throwing down on the floor of your accommodation when storing, breaking down or building the bike, also if you're renting a car throw it down to protect the rental car from dirt and grease. It might save you a hefty cleaning fee. The drop sheet will fit in your laptop bag reducing your baggage weight and you throw it out before heading home.
- The 3 most important items for ANY trip
- Thongs (the flip flop kind) - so handy to have when you are travelling. Going to the pool, shared showers, to avoid getting shoes wet and or muddy, I always find a need for them. They are also great for protection between the rear tyre and the end of the bike box.
- Boardies / Swimsuit - whether it's for hitting the spa or rehab in a near freezing pool always take something to have a swim in.
- Slumming Pants - whether it's trackies or a loose pair of shorts having something to just throw on and lie on the couch in total comfort is so important when travelling - on any trip.
Packing
- Cleaning your bike - if you are flying internationally you will need to make sure everything is clean of mud and dirt. Customs can be very picky about dirt on your bike (tyres, under seat, around forks and suspension pivots), shoes and backpack. They all need to be spotless - and I mean SPOTLESS! Soap, water and scrubbing brushes sort of clean. Those tyres need to look new!
- Don't forget to allow plenty of time to clean your bike before flying home.
- Find out if there is a bike wash at the trail or at your hotel, if not how are you going to clean your bike before you leave?
- Take something to clean the bike with such as rags and a brush. Toothbrushes are great for getting into tight areas.
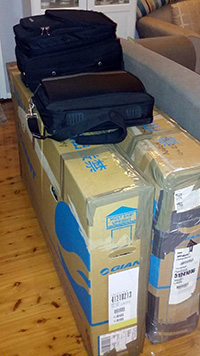
 Bike Box - hard bike boxes and bags are a great idea however they are heavy. A dual suspension mountain bike and bike bag will probably weigh 20kg or more, with a typical domestic baggage limit of 23kgs you probably won't have enough left for your clothes, tools and helmet. You can of course purchase additional weight, the cost of which depends on the airline and route - BUT IMPORTANTLY do this prior to departure, purchasing additional weight at the airport is ludicrously expensive.
I choose to use cardboard bike boxes which can usually be picked up from the LBS, most LBS' are happy to give them away but you might need to give them some warning. Otherwise you can sometimes pick them up at the airport .. but not always so don't bank on it.
Not all bike boxes are the same size, make sure you try your bike box well in advance. If your bike doesn't fit you may need to find a bigger box. If you are struggling find a bigger box find an LBS that turns over a lot of bikes and have a chat to them about when bigger bike boxes may be available and take your tape measure. Offer them some beer in return .. or better still buy something. Some LBS offer a packing service for up to about $50.
Important: some bike boxes are bigger than airlines will allow so ALWAYS measure and check the airlines allowance.
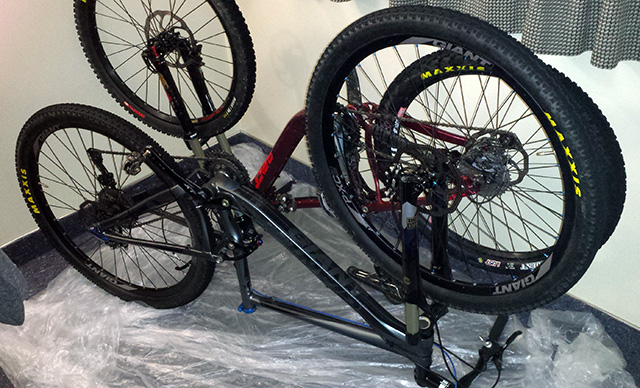
(Note: a lot more padding goes on my frames before they are packed, this was a test pack to ensure that the bikes fitted the box)- Padding - Use your clothes especially any protective gear to help pad out the box. Body armour, knee and elbow pads, thongs, towels etc are really useful. Bubble wrap is easy and cheep, if you can't flog some from the warehouse you will find it at hardware stores.
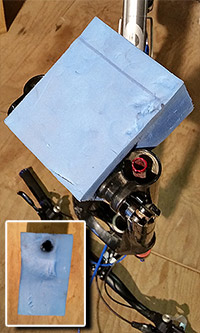 Fork protection - I bought a chunk of closed cell foam for a few bucks from Clarke Rubber to protect the front end. It not only protects the forks and through axel, it stops the forks from being crushed together, protects the brakes and brake mounts plus keeps everything a nice distance away from the box.
 - Brakes rotors and mech - ALWAYS remove your brake rotors and rear derailleur, it only takes 10 mins to do this. Replacing bent rotors and derailleurs is expensive and will cost valuable riding time. Depending on how tight your packing is you may also want to loosen your brake and gear levers to avoid damage. If you have a front derailleur move it into the most inner position. Remove the chain (so it doesn't scratch up your paint work), clean it, lube it up and place it in a ziplock bag.
- Brake spacers - Make sure you pad out your brake callipers with a bleed block or similar (make sure it's held in place by the retaining pin or some tape). Whether the type you use requires you to take the pads out or not is not so important just make sure the callipers are held open or you may need to do a full brake bleed before riding.
- Deflate everything - Tyres and suspension have to be fully deflated .. well so say the airlines. Generally most riders keep a small amount of air in the tyres to help protect the rims but if they ask you say yes fully deflated.
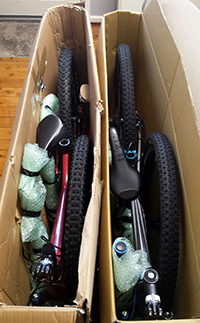
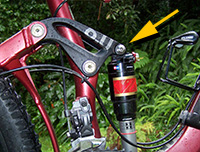 Bike is too big - If you're struggling to fit the bike in the box removing one of the linkages in the rear shock may give you that extra few centimetres compression you need to fit the bike in length ways. However you might just need to find a bigger box. See notes on bike boxes above. Some people take both wheels off but in my opinion that's not the best option:-
 - I can't fit both wheels beside the frame, but even if I could there would be no side impact protection for the rims
- By leaving the rear wheel on it protects the rear triangle and mech. A thong (shin, elbow or knee pad) and your partially inflated tyre will provide reasonable protection for the end and base of your rim.
- Bike too heavy - If you are struggling to get your bike box underweight then weigh your clothes and wear you're heaviest gear. Jeans, hoodies, jackets, thermals and shoes can weigh a lot more than you think, in fact a hoodie can easily weigh more than 1kg as can shoes!! Don't forget you can carry on your jacket, jumper or hoodie.
- Magical Laptop Bag - I've had carry-on baggage weighed so check you're under the carry on weight limit, however I've never seen anyone have their laptop bag weighed. Most airlines allow you to take a carry-on bag plus a laptop bag. Phone chargers, power board, GoPro, spare batteries, memory sticks, HDD, glasses/sunnies, maps, mags and dropsheet all go in the laptop bag with my laptop. My laptop bag weighs 5kg .. easy.
- No tools in carry-on baggage - Don't put your tools or pedals in your carry on. However if you do happen to have a banned item in your carry-on baggage they will usually let you check it in. In my experience that baggage isn't weighed. If you want to run the gauntlet it could be a way of getting more gear on board than you're supposed to!
- Lists - I'm always struggling to get under the weight limit. I spend hours trying to get as much stuff packed without being over the limit. This means switching stuff from the bike box(s) and carry on, however the real trick is remembering what went where for the return trip BECAUSE you may not have scales while travelling. This is where having a list of what is in what bag/box is really helpful.
- Return Weight Issues - Take stuff that you are happy to leave behind. Invariably you will pick up some new stuff on your trip so make sure there are things you can leave behind in order to stay underweight. Old clothes, old shoes, lube, sunscreen, even your chain, tyres or tubes.
Airlines
- There are 2 golden rules of air travel and you need get these things right
- Know the terms and conditions of travel with a bike
- Get your gear under weight because it's very expensive to pay overs at the airport
- Frequent flyers, club members and business class often get a significant increase in baggage allowance. For example as a Qantas Club member I get 32kg for domestic travel instead of 23kgs (which makes life much easier), and 42kgs when flying to NZ instead of 32kg - meaning I can take 2 bikes! If you're planning on flying a lot then it might be worth becoming a frequent flyer or club member.
Other sources of info
- Sacred Rides - Ultimate Guide to Mountain Bike Travel - 2nd Edition. A free downloadable PDF.
- Dan Milners How To Pack Your Bike for a Flight -
- I hadn't considered taking the brake calipers off, probably not a bad idea but that will add a bit of time to your rebuild
- IMO the order of take off should start with pedals then chain and in rebuild the last things to put back on are chain followed by pedals. Makes the whole process much cleaner and easier.
- Brake Rotor Bolts - Why wouldn't you just screw the brake rotor bolts back into the hub? That way you can't forget them.
- Search YouTube for great packing demos
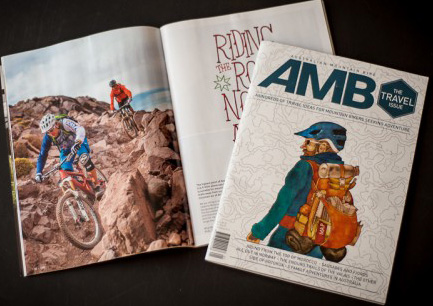
- AMB Magazine - Travel Issue (Late 2014) - has some neat bike packing ideas but I've never found a box wide enough to fit two wheels along side my Dually MTB frames.
If you have any tips of your own please add them below using Facebook and please don't hesitate to contact me for any info.
Some of the places I've got to via plane are listed below.

The Business of Mountain Biking
Trail Centres and Trails featured in this blog
- Currumbin Border Track (NSW/QLD Border, QLD)
- Daisy Hill (South Brisbane, QLD)
- Hinze Dam (Gold Coast, QLD)
- Mt Joyce (Gold Coast Hinterland, QLD)
- Nerang State Forest (Gold Coast, QLD)
- Rotorua Redwoods (New Zealand, NZ)