

Silver Mountain Bike Park - is there a better descent in the world?
WOW - Lithium Trail - Teton Pass, Jackson Wyoming
The not so enjoyable part of Mountain Biking in Whistler
Bottom of the World - Surviving Whistler Top to Bottom
Conquering Whistler's Top of the World Trail
Fantasy Enduro - Enduro World Series Fantasy Game
Is the Thredbo AM Trail the best descent in Australia?
MTB Trail Videos - Trail Centre Upgrade Program
VIDEO: The Fourth 365 Days of Reign - My 4th year of Mountain Biking
Pilot Wilderness Ride - Cascade to Pinch - Part 2
Pilot Wilderness Ride - Cascade to Pinch - Part 1
MTB Workout for the Deskbound
Finding Bruce Ridge and Loving It!
VIDEO: Top XC Rides of 2014/2015
VIDEO: 2015 The FAIL Awakens
VIDEO: Nine Days in the Rotorua Redwoods
Exploring all of Sparrow Hill and the East Kowen Forest
VIDEO: 365 Days of Reign - The Third (year of serious mountain biking)
The New Majura Pines and Sparrow Hill Trip
Mountain Biking in the NSW Snowy Mountains
Long term test: Yakima Highroller and Whispbar roof rack
Travelling tips for Mountain Bikers
VIDEO: Giant Anthem 29er vs Giant Reign 26
VIDEO: 2014 FAILS - Will Ride, Will Fail
VIDEO: MTB-TVs TOP 10 Descents of 2014
VIDEO: The Opening of the Alpine Epic Trail - Mt Buller
VIDEO: Wrapping up the Redwoods with a Whak-en Outrageous Ride
VIDEO: Return to the Redwoods Part IV - Eagle vs Shark
VIDEO: Return to the Redwoods Part III - XC Lower Mountain Pedally Days
VIDEO: Return to the Redwoods Part II - Heavily Rooted
VIDEO: Return to the Redwoods Part I - We're Going To The Redwoods
Video: Return to Rotorua ... ok to go!
Video: Return to Rotorua ... definitely maybe!
Video: Return to Rotorua .. maybe?
Cycology - Cycling inspired clothing
Broken Bone on Breakout
Mountain Bike Fail to Triumph in the You Yangs
365 Days of Reign - My 2nd Year on a real mountain bike
Review: the Bionicon C-Guide V2.0
Brake disk rotor size upgrade 180 to 200mm, 160 to 180mm
VIDEO: Rotorua Redwoods - Create Breathing Space
Rotorua - a Mountain Bikers Journey
Summer Mountain Bike Training at OMV
2013 Another Year of #FAIL
We're going to ride the Rotorua Redwoods
My god I love riding Stromlo Forest Park
Merry Christmas from MTB-TV - What a year its been
How to view web based KML files on your mobile device
Epic Brake Bleeding Solutions - Avid Brake Bleed Kit
The Lone Wolf enjoys some group action
Bantry Bay (Northern Beaches, Sydney)
Bruce Ridge (Canberra)
Bungarra Alpine Centre (Snowy Mountains)
Currumbin Border Track (NSW/QLD Border)
Daisy Hill (South Brisbane)
East Kowen (Kowen Pine Forest, Canberra)
Forest Pipeline (Northern Beaches, Sydney)
Fred Caterson Reserve (Castle Hill)
Golden Jubilee Field MTB Park (North Shore, Sydney)
Hassans Walls (Lithgow)
Hinze Dam (Gold Coast)
Jackson (Jackson)
Jindabyne (Snowy Mountains)
Kiwarrak State Forest (Tarree)
Majura Pines (Majura, Canberra)
Manly Dam (Northern Beaches, Sydney)
Mt Joyce (Gold Coast Hinterland)
Mt Kosciuszko (Snowy Mountains)
Nerang State Forest (Gold Coast)
Newnes (Lithgow)
Old Man's Valley (Hornsby, Sydney)
Ourimbah (Central Coast)
Oxford Falls (Northern Beaches, Sydney)
Pilot Wilderness (Snowy Mountains)
Red Hill (Northern Beaches, Sydney)
Rotorua Redwoods (New Zealand)
Silver Mountain (Kellogg)
Singleton (Hunter Valley)
Sparrow Hill (Kowen Pine Forest, Canberra)
St Ives and Belrose (North Shore, Sydney)
Stromlo Forest Park (Canberra)
Terrey Hills (Northern Beaches, Sydney)
The Oaks (Blue Mountains)
Thredbo Resort (Snowy Mountains)
Thredbo Valley Trail (Snowy Mountains)
Whistler Bike Park (Whistler)
Wingello (Southern Highlands)
Wylde MTB Trail (Cecil Park - Western Sydney)
Long term test: Yakima Highroller and Whispbar roof rack
Ive been a big fan of the tow-bar bike rack for as long as Ive been riding a mountain bike. The ease of loading the bike had me totally convinced that a roof rack system was not for me, however my long term test with the Yakima Racks Highroller has made me a roof rack convert.
When choosing a roof rack system I was adamant that the wheels had to remain attached. My original concern was the potential contamination of the through axle by fitting and removing the wheel at the trail head, but after using the Highroller for a few months it became blatantly obvious that there was an even bigger advantage I didn't have to find space for the wheel. Being able to leave the wheel on enabled me to take my bike on many family trips where there was no chance the wheel would fit in the car.

I had my doubts about how easy it would be to hoist my bike onto the roof. I can appreciate that getting a carbon road bike up on the roof is fairly straight forward but I'm only 175cm and lifting a 15kg alloy enduro bike after a day of descending is a totally different story. The key however was in the technique, more about the technique below.

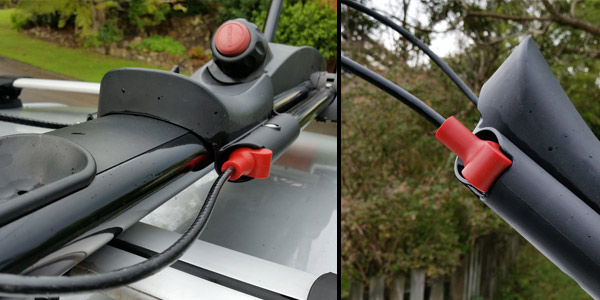
The Highroller comes with a locking cable however the lock is sold separately. You can key match to the rack locks. It tucks away very neatly inside the rack when not in use.
We mounted the Highroller to Yakima's premier roof rack system the Whispbar. A very neat looking aero design that was easy to fit and didn't require any cutting. The end mounting brackets have a clever ratchet system that allows the bar length to be adjusted and centred. Once in position the bar is held in place with a locking screw as are the door mounting brackets. All tools are provided in the kit as well as tools located inside the end cover (handy in an emergency). The end covers are securely held in place with a keyed lock.

The position of the bars is well outlined in the instructions but was aided by the flattened mounting zones conveniently located in my cars door frames. Mounting the Whispbar roof racks was very simple but best done with the assistance of another person to keep everything in position and avoid scratching paint as you lock everything in place.
The Whispbar comes with default mounting pads, however it is recommended to pick up a set of pads specifically designed for your vehicle. Yakima have a self service tool on their website so you can identify the right product numbers for your vehicle.
I've found the Whispbar roof racks very quiet, even with the Highroller rack installed.
The direction in which the Highroller is mounted is dependent on your vehicle.
I found the Highroller very easy to use with my 26 all mountain bike (15 kg), 29er XC (13kg) and 700cc Hybrid. Adjusting the Highroller to suit the wheel size is as simple as flicking a lever, sliding the bracket to the predetermined position for the wheel size and locking down. The rear wheel ratchet slides easily up the track to fit the bike, even with the bike already in the rack.
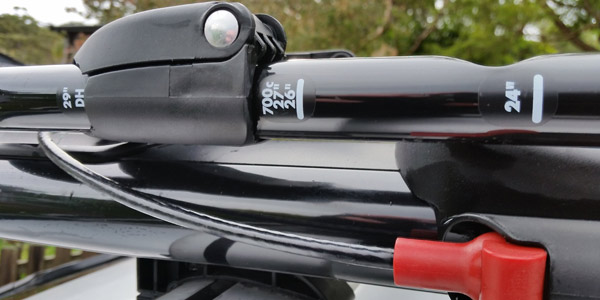
The only issue we've encountered has been undoing the front wheel lock when the tyre heated up and the air expanded after being loaded in freezing conditions. This was easily remedied by letting a bit of air out of the tyre. #ProTip
Performance has been flawless. Plenty of local trips and many long distance return trips (of up to 8 hours each way) and I've not experienced loosening of any mounts or the bike lock mechanism.
My experience has been extremely positive, I've become a massive convert to the roof rack system and towbar rack only comes out when I need to carry more than one bike.
Some of the advantages:
- Believe it or not I've found it quicker, simpler and far more convenient to mount my bike on the roof than on the towbar rack
- In Australia its illegal to drive with a towbar rack that doesnt have bike on it, with the Highroller I dont have to remove and stowe the rack after every ride
- My boot lid and bumper arent getting scratched up by pedals and handle bars
- Not having to dismantle the bike in anyway is an absolute winner!
Getting the bike up on the roof:
Place the bike parallel to the car facing the opposite way to how it will sit in the rack. With one hand grab the chain stay and with the other grab the fork, obviously the higher you can go the better for stability but you still need to be able to get the bike up on the roof. I have to grab the fork near the bottom to get enough height. With a firm grip lift the bike and twist your body 180° essentially driving the front wheel into stand. With both wheels in their tracks and the front in the rack it's quite easy to steady the bike while you pull up the front wheel locking stand.
Removing the bike is pretty much the same method, grab the fork as high as you can to avoid the bike toppling, back it out of the rack and twist back 180°.
I found the lift-twist and twist-drop was far more stable than trying to lift and walk in because the bike remains relatively stable moving in a twisting motion rather than a lateral direction.
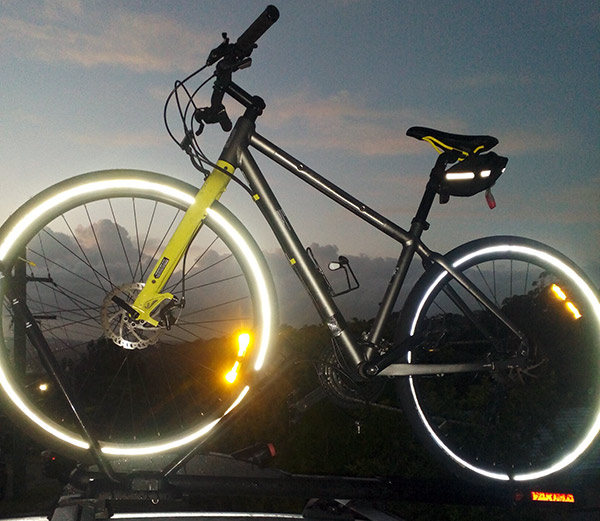
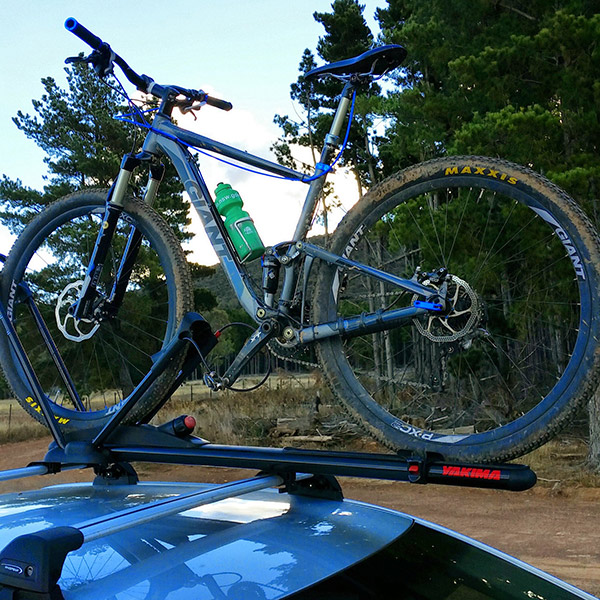
Some of the places I've taken the Yakima Racks Highroller and Whispbar roof rack system.
Trail Centres and Trails featured in this blog
- Bantry Bay (Northern Beaches, Sydney, NSW)
- Bungarra Alpine Centre (Snowy Mountains, NSW)
- Fred Caterson Reserve (Castle Hill, NSW)
- Jindabyne (Snowy Mountains, NSW)
- Manly Dam (Northern Beaches, Sydney, NSW)
- Old Man's Valley (Hornsby, Sydney, NSW)
- Ourimbah (Central Coast, NSW)
- Oxford Falls (Northern Beaches, Sydney, NSW)
- Red Hill (Northern Beaches, Sydney, NSW)
- Singleton (Hunter Valley, NSW)
- St Ives and Belrose (North Shore, Sydney, NSW)
- Stromlo Forest Park (Canberra, ACT)
- Terrey Hills (Northern Beaches, Sydney, NSW)
- Thredbo Resort (Snowy Mountains, NSW)
- Thredbo Valley Trail (Snowy Mountains, NSW)
- Wylde MTB Trail (Cecil Park - Western Sydney, NSW)