

Silver Mountain Bike Park - is there a better descent in the world?
WOW - Lithium Trail - Teton Pass, Jackson Wyoming
The not so enjoyable part of Mountain Biking in Whistler
Bottom of the World - Surviving Whistler Top to Bottom
Conquering Whistler's Top of the World Trail
Fantasy Enduro - Enduro World Series Fantasy Game
Is the Thredbo AM Trail the best descent in Australia?
MTB Trail Videos - Trail Centre Upgrade Program
VIDEO: The Fourth 365 Days of Reign - My 4th year of Mountain Biking
Pilot Wilderness Ride - Cascade to Pinch - Part 2
Pilot Wilderness Ride - Cascade to Pinch - Part 1
MTB Workout for the Deskbound
Finding Bruce Ridge and Loving It!
VIDEO: Top XC Rides of 2014/2015
VIDEO: 2015 The FAIL Awakens
VIDEO: Nine Days in the Rotorua Redwoods
Exploring all of Sparrow Hill and the East Kowen Forest
VIDEO: 365 Days of Reign - The Third (year of serious mountain biking)
The New Majura Pines and Sparrow Hill Trip
Mountain Biking in the NSW Snowy Mountains
Long term test: Yakima Highroller and Whispbar roof rack
Travelling tips for Mountain Bikers
VIDEO: Giant Anthem 29er vs Giant Reign 26
VIDEO: 2014 FAILS - Will Ride, Will Fail
VIDEO: MTB-TVs TOP 10 Descents of 2014
VIDEO: The Opening of the Alpine Epic Trail - Mt Buller
VIDEO: Wrapping up the Redwoods with a Whak-en Outrageous Ride
VIDEO: Return to the Redwoods Part IV - Eagle vs Shark
VIDEO: Return to the Redwoods Part III - XC Lower Mountain Pedally Days
VIDEO: Return to the Redwoods Part II - Heavily Rooted
VIDEO: Return to the Redwoods Part I - We're Going To The Redwoods
Video: Return to Rotorua ... ok to go!
Video: Return to Rotorua ... definitely maybe!
Video: Return to Rotorua .. maybe?
Cycology - Cycling inspired clothing
Broken Bone on Breakout
Mountain Bike Fail to Triumph in the You Yangs
365 Days of Reign - My 2nd Year on a real mountain bike
Review: the Bionicon C-Guide V2.0
Brake disk rotor size upgrade 180 to 200mm, 160 to 180mm
VIDEO: Rotorua Redwoods - Create Breathing Space
Rotorua - a Mountain Bikers Journey
Summer Mountain Bike Training at OMV
2013 Another Year of #FAIL
We're going to ride the Rotorua Redwoods
My god I love riding Stromlo Forest Park
Merry Christmas from MTB-TV - What a year its been
How to view web based KML files on your mobile device
Epic Brake Bleeding Solutions - Avid Brake Bleed Kit
The Lone Wolf enjoys some group action
Bantry Bay (Northern Beaches, Sydney)
Bruce Ridge (Canberra)
Bungarra Alpine Centre (Snowy Mountains)
Currumbin Border Track (NSW/QLD Border)
Daisy Hill (South Brisbane)
East Kowen (Kowen Pine Forest, Canberra)
Forest Pipeline (Northern Beaches, Sydney)
Fred Caterson Reserve (Castle Hill)
Golden Jubilee Field MTB Park (North Shore, Sydney)
Hassans Walls (Lithgow)
Hinze Dam (Gold Coast)
Jackson (Jackson)
Jindabyne (Snowy Mountains)
Kiwarrak State Forest (Tarree)
Majura Pines (Majura, Canberra)
Manly Dam (Northern Beaches, Sydney)
Mt Joyce (Gold Coast Hinterland)
Mt Kosciuszko (Snowy Mountains)
Nerang State Forest (Gold Coast)
Newnes (Lithgow)
Old Man's Valley (Hornsby, Sydney)
Ourimbah (Central Coast)
Oxford Falls (Northern Beaches, Sydney)
Pilot Wilderness (Snowy Mountains)
Red Hill (Northern Beaches, Sydney)
Rotorua Redwoods (New Zealand)
Silver Mountain (Kellogg)
Singleton (Hunter Valley)
Sparrow Hill (Kowen Pine Forest, Canberra)
St Ives and Belrose (North Shore, Sydney)
Stromlo Forest Park (Canberra)
Terrey Hills (Northern Beaches, Sydney)
The Oaks (Blue Mountains)
Thredbo Resort (Snowy Mountains)
Thredbo Valley Trail (Snowy Mountains)
Whistler Bike Park (Whistler)
Wingello (Southern Highlands)
Wylde MTB Trail (Cecil Park - Western Sydney)
Mountain Bike Avid Brake Bleed - Success!
This morning I completed what I would call my first major bike maintenance procedure. Ive changed tubes, tyres, chains, cassettes, brake pads and rotors, Ive even strung a few shifter cables but bleeding hydraulic brakes was a step-up.
 Prior to starting @backontrack00 gave me some great tips on buying a bleed kit. The Avid kit contains a couple of very handy things. A range of caliper blocks and brake pad spacers to ensure your calipers (with or without pads) stay spaced correctly during the procedure and hose camps on the filler tubes.
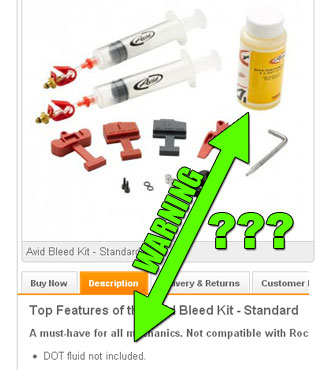
When purchasing a bleed kit check what is included in the package carefully! Some online retailers show incorrect images of the kits, specifically an image showing DOT fluid when the kit doesnt contain it. Make sure you check the description when buying and know exactly what it is you are buying.
The other great tip I received was to watch YouTube videos about brake bleeding. I didnt have to look too far as Avid have a couple of great videos (http://www.youtube.com/watch?v=IoaPUw5DliA and http://www.youtube.com/watch?v=GzZkEIrCBJ0) and by studying both of them I got a pretty good understanding of what we were going to do and why. For me the why is important because it helps me to understand how anal I need to be about getting it 100% right.
Interestingly however neither of these videos linger on a very important point - you dont want to get the DOT fluid anywhere near the brake pads or brake rotor or you are very likely to destroy a set of pads. If you have a bleed kit with a caliper block there is no reason to leave your wheel on. So do yourself a favour by removing the wheel, removing your pads and use a caliper block when doing the bleed.
 Other tips:
- Try using the hose clips before filling the syringes with DOT fluid. Learn how to open and close them with one hand before they get covered in oil.
- Be patient when trying to get the air out of the DOT fluid. The more air you get out of the DOT fluid the less air will end up in your brake line.
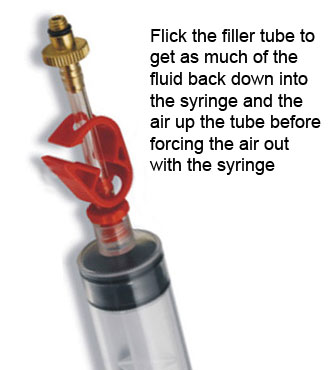
- Getting the air out of the syringe can be messy because you will lose some DOT fluid in the process. After releasing the hose clamp work the air bubbles up the filler tube. You may need to flick the tube to get the bubbles all the way up. The more air you can work up the tube, and the more fluid you can get to run back down into the syringe the less waste and the less mess you will make when forcing the air out with the plunger.
- In case its not obvious you need to do everything in your power to get the air out of the brake system. This is the main objective of bleeding the brakes, so be patient. Get all the air out of the calipers, out of the lever and importantly out of the syringe and filler hose before attaching them. There is no point in pumping air back into the system! I was very surprised how much air came out of the calipers it took some time to completely clear all the air.
- In the videos they made the whole process look very clean, I found it far more messy, so my tip is to have your rags and alcohol wipes ready.
Alcohol Wipes: I picked up a box of 60 individually packaged alcohol wipes for less than $10 from Office Works of all places (but you will find them in chemists etc). They are great for cuts and grazes, cleaning break disc rotors and wiping off grease and oil from your bike (dont use wetones or baby wipes because they contain other impurities). I have a few of these stashed in my backpack, my car and toolboxes etc. Very handy.
If you have any tips on brake bleeding let me know or add your comment.